Welcome to the second Mini Code Adventure, a series of blog posts and videos that highlight fun and exciting projects that you get running in just a few minutes.
For this project, we’re assuming you have NodeJs and Yeoman installed, and we assume you have a basic understanding of HTML and JavaScript.
Now, let’s get to playing with Markov Chains!
Mocking data with Markov Chains
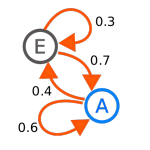
Markov Chains are a process that cultivates a statistical model of nodes. These statistics make it easy to generate new data, based on the likelihood of each node following another. The resulting data looks surprisingly realistic, especially if you feed it a lot of data.
People have done a lot of really cool stuff with Markov Chains, and thanks to some nice packages, you can easily do something cool yourself!
Here are a couple interesting things people have done:
- Using Markov Chains to create Twitter bots
- Making music with Markov Chains
- Garkov – Markov generated Garfield Cartoons
- Generating new Shakespeare Sonnets with Markov Chains
Pretty cool eh, and like I said…it’s really easy to start playing around. Check out the video for more details on what is happening. You can also find the source code at github, as well as a working example…or you can just code it yourself:
Step 1: Setup the project with Yeoman
Setup is really easy, just a few commands. Check out the post on yeoman if you’re curious about what it’s doing.
|
1 2 3 4 5 6 |
npm install -g yo npm install -g generator-browserify yo browserify #Note: Make sure you're in a good dir! npm install --save <a href="https://www.npmjs.com/package/markov">markov</a> gulp browserify gulp serve |
Step 2: Setup the user interface
Now you just need to add up a button and a couple of textareas. This allow us to interact directly with the library. There are great examples for how to make nice looking Bootstrap controls, so you don’t have to spend any effort there.
Step 3: Glue the pieces together with javascript
Now we just need a little bit of javascript to glue the pieces together. We’ll hookup the button so it grabs from the input textarea, runs it through the library, and dumps the output into the other textarea.
Step 4: Do cool stuff!
Now you’ve got all the pieces and it’s time to start messing around! Try experimenting with different kinds of data to see what you can come up with.
So, that’s it for this session. Go forth, explore, make cool stuff!


